Android ListView #
The Recycler View is an extension of the ListView. Therefore, in this article, the ListView will be introduced and in another one the RecyclerView. The two views are conceptually very similar, which makes the RecyclerView relatively easy to understand.
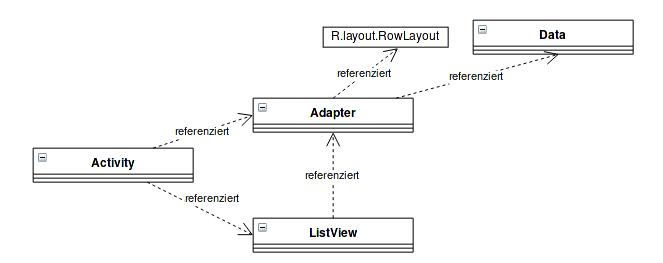
The starting point in the example is an activity. Of course, it could also be a fragment.
The ListView needs an object that it can ask for individual rows. This object is passed to the ListView with setAdapter(...). In summary, the adapter’s task is to prepare data from an array or a List
The ListView must be defined in the layout of the activity or fragment:
<ListView
android:layout_width="match_parent"
android:layout_height="match_parent"
android:id="@+id/listView"/>
When working with simple data types like string or integer, the Android project has already prepared an adapter that can be used. Furthermore, they have already created a simple row layout that can be used if needed. The row layout is used to display an element in the list.
Example with Strings #
In the example below, a list full of strings is to be displayed in a ListView. To do this, first the context is specified, then a line layout, for example from the Android project, and finally a list with the data.
//this ist die Instanz der Activity ansonsten getActivity() verwenden
ArrayAdapter<String> adapter = new ArrayAdapter<String>(this, android.R.layout.simple_list_item_1, myStringArray);
If a custom row layout is to be used, the TextView in which the string is to be displayed must also be specified.
ArrayAdapter<String> adapter = new ArrayAdapter<String>(this, R.layout.myLayout, R.id.usedTextLabel, myStringArray);
Example with custom Adapter #
To make the custom adapter a little more exciting, a custom POJO class Module is used below.
In line 13, a line is created for the ListView. The layout XML is “inflated” by an Android object.
From line 16 to 20, the various click listeners are set. Since the row layout contains a checkbox, its clicks can be registered. In addition, the line is filled with data from the data list.
Line 26 is important, otherwise the list remains empty.
public class Module {
 String code;
 boolean checked;
 public String getCode() {return code;}
 public void toggleChecked() {checked = !checked;}
}
MyAdapter adapter = new MyAdapter(this, R.layout.myLayout, moduleList);
And the implementation of the adapter:
public class MyAdapter extends extends ArrayAdapter<Module> {
  private List<Module> data;
  public MyCustomAdapter(Context context, int rowLayout, List<Module> moduleList) {
    super(context, rowLayout, moduleList);
    data = moduleList;
  }

  @Override
  public View getView(int position, View convertView, ViewGroup parent) {
    if (convertView == null) {
      // Alternative: LayoutInflater layoutInflater = LayoutInflater.from(parent.getContext());
      LayoutInflater layoutInflater = (LayoutInflater) getActivity().getSystemService(Context.LAYOUT_INFLATER_SERVICE);
      convertView = layoutInflater.inflate(R.layout.rowlayout, null);
    }

    final Module module = data.get(position);
    TextView tw = (TextView) convertView.findViewById(R.id.textView);
    CheckBox cb = (CheckBox) convertView.findViewById(R.id.checkBox);
    cb.setOnClickListener((View v) -> module.toggleChecked());
    tw.setText("(" + module.getCode() + ")");

    return convertView;
  }

  @Override
  public int getCount() {return data.size();}
}
Usage #
The usage is the same in all cases.
In the lambda on line 2, the click listener returns the ListView in the variable parent. The variable view contains a view created in the getView(...) function. The position corresponds to the index of the data in the data list. Finally, an id variable that could have been customized with getItemId(...).
The click listener is called as soon as the user clicks on an item. For example, the user does not have to click on the checkbox, but it is enough that the respective line was clicked.
listView.setAdapter(adapter);
listView.setOnItemClickListener((parent, view, position, id) -> {
  Module module = (Module) parent.getItemAtPosition(position);
  module.setSelected(!module.isSelected());
  dataAdapter.notifyDataSetChanged();
});